


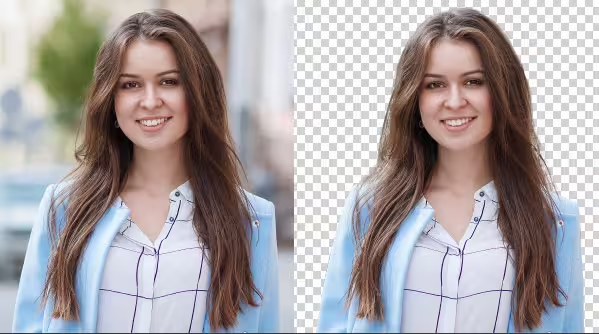
Removing a background from an image in Photoshop is a fundamental skill that can elevate your design projects. Whether you're working with product photos, portraits, or creative compositions, learning how to remove backgrounds efficiently is a key technique for producing professional-looking images.
In this guide, we’ll walk you through the step-by-step process of removing backgrounds using Photoshop’s powerful tools. We’ll cover everything from simple selection methods to more advanced techniques, so you can easily achieve clean edges and polished results. Ready to get started? Let’s dive in!
The Basics of Photoshop Tools
Before diving into the process of removing backgrounds, it's important to familiarize yourself with the key Photoshop tools that will help make the task easier. While Photoshop has multiple tools for background removal, knowing when and how to use each one is crucial for getting the best results.
Key Tools in Photoshop for Background Removal
There are a few primary tools in Photoshop that you’ll use most often when removing a background. These tools are built for precision, and each one has its strengths depending on the image you're working with.
- Quick Selection Tool: This tool allows you to quickly paint over an area to select the subject of the image. It's great for images where the subject has a well-defined edge from the background. It automatically detects boundaries, making selection fast and intuitive.
- Magic Wand Tool: Perfect for simpler backgrounds, the Magic Wand Tool selects pixels based on color. It’s great for removing solid or uniform-colored backgrounds. Just click on the area you want to remove, and Photoshop will select everything in a similar color range.
- Pen Tool: For more complex or intricate edges, like hair or fur, the Pen Tool is ideal. It allows you to create precise paths around your subject, giving you total control over the selection. While it takes more time to master, it's the most accurate for clean, sharp edges.
- Layer Masks: Once you have selected the background, Layer Masks allow you to hide parts of your image non-destructively. You can refine your selection later, without permanently deleting parts of the image, which is crucial for maintaining flexibility during editing.
Layers and Layer Masks
In Photoshop, working with layers is essential for non-destructive editing. Each element in your image (the background, subject, etc.) is placed on a separate layer, which gives you the freedom to make changes without affecting the original content.
Layer Masks are powerful tools that allow you to hide portions of your image while keeping the original intact. For background removal, you’ll often use a Layer Mask to hide the selected background, ensuring that no part of the image is permanently deleted. This flexibility is key to making adjustments without starting over.
Step-by-Step Guide for Removing a Background in Photoshop
Now that you're familiar with the essential tools in Photoshop, let’s walk through the process of removing a background from an image. This step-by-step guide will help you achieve clean, professional-looking results.
Step 1: Open Your Image in Photoshop
The first thing you’ll need to do is open your image in Photoshop. To do this, simply go to File > Open and select the image you want to work with. Once your image is open, it’s a good idea to duplicate the layer to preserve the original. You can do this by right-clicking the layer in the Layers Panel and selecting Duplicate Layer.
By working on the duplicate, you ensure that you can always go back to the original image if needed.
Step 2: Select the Background Using the Quick Selection Tool
Now comes the fun part—selecting the background. The Quick Selection Tool is one of the easiest ways to do this. Select it from the toolbar (or press W), and then click and drag over the area you want to select.
Photoshop will automatically detect the edges of your subject and help you select the background. If the tool selects parts you don’t want, hold down the Alt key (or Option on Mac) to subtract from the selection.
Once you have the background selected, you’re ready to move on.
Step 3: Refine the Edges of the Selection
If your selection isn’t perfect—don’t worry! Photoshop has a powerful feature called Select and Mask that allows you to refine your edges. Click on Select and Mask in the options bar at the top, and use the Refine Edge Brush Tool to clean up any fuzzy or hard-to-select areas, especially around hair or fur.
You can also adjust the Smooth, Feather, and Contrast sliders to fine-tune the selection. When you’re happy with the selection, click OK to apply the changes.
Step 4: Remove the Background
Now that you’ve made a clean selection, it’s time to remove the background. There are a couple of ways to do this:
- Delete the Background: If you want to permanently remove the background, simply press the Delete key. However, this method isn’t ideal for preserving the flexibility of your image.
- Use a Layer Mask: The better option is to use a Layer Mask. With the selection still active, click the Layer Mask button at the bottom of the Layers Panel. This will hide the background instead of deleting it, making the edit non-destructive and easy to adjust later.
Step 5: Fine-Tuning the Image
With the background removed, it’s time to tidy up your image. There might be some rough edges or leftover bits of the background that didn’t get selected. You can use the Eraser Tool or the Clone Stamp Tool to clean these up.
If your image has soft, detailed areas (like hair), use the Smudge Tool to gently blend any harsh edges, making the image look more natural.
Alternative Methods for Background Removal
While the Quick Selection Tool and Layer Mask method are often the quickest and easiest, there are times when you might need more precision or different techniques. In this section, we’ll explore some alternative methods for background removal in Photoshop, each suitable for different types of images.
Using the Pen Tool for Precise Selections
If you're working with an image that has sharp edges or complex outlines, such as a product or an object with clear, defined borders, the Pen Tool is your best friend.
The Pen Tool allows you to create precise paths around your subject, making it perfect for images where a clean, sharp selection is necessary. To use it:
- Select the Pen Tool from the toolbar (or press P).
- Click around the edges of your subject to create anchor points, and Photoshop will automatically connect them with a path.
- Once you’ve outlined the subject, right-click and choose Make Selection. This will convert the path into a selection.
- From there, you can add a Layer Mask to remove the background, just like we did in the previous steps.
The Pen Tool is more time-consuming than the Quick Selection Tool, but it gives you the highest level of control for intricate designs.
The Magic Wand Tool for Simple Backgrounds
If you're dealing with a simple background—like a plain, solid color or a contrasting background—the Magic Wand Tool is a fast and effective solution.
Here’s how you use it:
- Select the Magic Wand Tool (shortcut: W).
- Click on the area of the background you want to remove. The Magic Wand will select all pixels that are similar in color.
- Adjust the Tolerance in the top bar to control how sensitive the selection is. Lower values select only very similar colors, while higher values expand the range.
- Once the background is selected, press Delete to remove it, or add a Layer Mask for a non-destructive edit.
The Magic Wand Tool is ideal for removing backgrounds with a uniform color, but it may not work well with more complex or multi-colored backgrounds.
Using Photoshop Actions for Quick Background Removal
If you find yourself needing to remove backgrounds from multiple images, manually doing it for each one can be time-consuming. This is where Photoshop Actions come in handy. Photoshop Actions allow you to automate repetitive tasks, such as background removal, saving you a significant amount of time.
What Are Photoshop Actions?
A Photoshop Action is a set of pre-recorded steps that can be applied to any image with a single click. These actions allow you to automate processes, like background removal, without having to repeat the steps manually each time.
For example, if you regularly remove backgrounds from product images, you can create an action that automatically selects the background, applies a mask, and cleans up the edges. Once the action is recorded, you can apply it to multiple images in batch processing, speeding up your workflow.
How to Install and Use Photoshop Actions
- Install Actions: First, you’ll need to either create or download Photoshop actions. You can find free and paid actions online that are designed for background removal.
- Load Actions: To load your actions, open Photoshop, go to the Actions Panel (Window > Actions), and click the menu in the top right. Select Load Actions to import the action file you’ve downloaded.
- Apply the Action: Once the action is loaded, simply open the image you want to edit, select the action in the Actions Panel, and click the Play button. Photoshop will automatically apply all the steps recorded in the action, including background removal.
- Batch Process: You can even automate background removal for multiple images at once by using the Batch Processing feature (File > Automate > Batch).
Photoshop Actions is an excellent tool for professionals who need to process large numbers of images quickly. They streamline your workflow and save you valuable time.
Final Tips for Perfecting Background Removal
While removing backgrounds in Photoshop is fairly straightforward, achieving perfect results requires a bit of finesse. In this section, we’ll go over some final tips to help you perfect your background removal skills, ensuring clean, professional-looking images every time.
Exporting the Image with a Transparent Background
Once you’ve successfully removed the background from your image, the next important step is saving the image correctly. To keep the background transparent (so you can place your subject over different backgrounds), you need to export the file in PNG format. Unlike JPEG, PNG files support transparency, which makes them perfect for e-commerce sites, social media graphics, or design projects.
Here’s how to export with a transparent background:
- After removing the background and ensuring the subject is cleanly separated, go to File > Export > Export As.
- In the export window, choose PNG as the format.
- Make sure the Transparency box is checked, and then click Export.
This will save the image with the background removed, and ready for use in other projects.
Avoiding Common Mistakes in Background Removal
While Photoshop provides powerful tools for background removal, it’s easy to make mistakes along the way. Here are some common issues to watch out for and how to fix them:
- Rough Edges: If your subject has rough edges after background removal (especially around hair or fur), use the Refine Edge or Select and Mask tools to smooth things out. You can adjust the Smooth, Feather, and Contrast settings to make edges cleaner.
- Unwanted Background Left Behind: Sometimes, parts of the background might remain even after selection. Use the Eraser Tool or Brush Tool on your Layer Mask to clean up any leftover areas. Zoom in for more precise editing.
- Overlapping Areas: If your selection overlaps with your subject, use the Quick Selection Tool to add or subtract from the selection until you get the clean cut you want.
By paying attention to these details, you'll be able to produce clean, high-quality images with ease.
Conclusion
Removing a background in Photoshop is an essential skill that opens up endless possibilities for your design projects. Whether you’re working with product photos, creative designs, or portraits, mastering background removal will give you greater control and flexibility over your images.
By using the right tools, understanding layers, and practicing different methods, you can quickly and efficiently remove backgrounds with professional results. With Photoshop’s powerful features like Layer Masks, Quick Selection Tool, and Pen Tool, you have all the tools you need to perfect your background removal skills. Keep practicing, and soon you’ll be able to tackle even the trickiest images with ease.
FAQs About Removing a Background in Photoshop
How do I remove a background in Photoshop without using the Pen Tool?
If you want to skip the Pen Tool, the Quick Selection Tool or Magic Wand Tool are good alternatives. These tools are great for simpler backgrounds and can help you quickly select and remove the background by either deleting or using a Layer Mask for non-destructive editing.
What is the quickest way to remove a background in Photoshop?
The fastest method is using the Quick Selection Tool. With a few strokes, Photoshop will automatically detect the edges of your subject and allow you to either delete or mask the background. For simpler, solid-colored backgrounds, the Magic Wand Tool is also effective.
How can I remove a background from an image with complex edges, like hair?
For images with complex edges, like hair or fur, Select and Mask is your best bet. Use the Refine Edge Brush to smooth out edges and avoid harsh lines. This tool will help preserve the intricate details of your subject while cleaning up the selection.
Why are my selections looking rough after removing the background?
Rough edges often occur around areas like hair or textured objects. To fix this, use the Refine Edge or Select and Mask options in Photoshop. Adjust the settings for smoothness, feathering, and contrast to get a cleaner, more professional look.
How do I save an image with a transparent background?
Once you’ve removed the background, you’ll need to export the image in PNG format. Go to File > Export > Export As select PNG, and ensure the Transparency box is checked. This will allow you to save the image with a transparent background for use in other projects.


